

lesson 8 | VPS Server | what is VPS?
in the name of Allah the entirely
merciful the especially merciful

peace be upon you and welcome to lesson 8
in the Server Admin Course
I am Muhammad ElNmr from
(SystemAC) Blog & Channel
and this lesson is the VPS Server

(SystemAC) Blog & Channel
and this lesson is the VPS Server

The content of this lesson
in this lesson, we will discuss the following pointspoint 1: what is the VPS server
point 2: how does any server
Introduce the VPS service
point 3: VPS most popular application types and
point 3: VPS most popular application types and
In practical
one: how to install the VPS server andTwo: creating a VPS and Tuning its settings

point: 1 what is the VPS server
it's a server whichintroduces the service of virtual
private servers VPS, this means that the
server is divided into a group of small
virtual servers called VPS and each VPS
Takes a specific part from the server's
resources such as RAM, CPU, hard disk and
Etc..., and this image shows that
if this is the main VPS
Server, it divided into a small VPS
servers and each VPS can hold
a private operating system such as
Windows or Linux


point 2: how does any server introduce the VPS service
it will be achieved when we install any VPS
Server application on


Point 3: VPS server most popular application types and we
will mention them in linux system
where there are: the XenServer and VirtualBox
where there are: the XenServer and VirtualBox
And others and in windows systems there is
the hyper-v of Microsoft company

the practical part
and you will explain 1: how to install the VPS server
We chose here the VirtualBox program
2: creating a VPS and the tuning its
settings


No.1: installing the VirtualBox program VPS server
on Windows Server 2008 R2
Note that the VirtualBox program can be
used in Windows and in Linux systems

First, open your browser on the server
and then open Google search and type
"Download VirtualBox" and then click on
downloads oracle VM virtualbox the first link

After that this page will appear
to you and here's the last version
VirtualBox 5.2.6

we will choose a

we will choose a
"windows hosts" as we install on
Windows Server 2008 r2, if you have a
Linux system you will press "Linux
distributions" as we said before we
will install on Windows Server 2008 r2
Then we will choose a or
click on "Windows hosts" after that your
download will be shown with you

After the VirtualBox a program is

After the VirtualBox a program is
downloaded with, you right click on it
and then press on "run as administrator"
to set up

After that press next

and here

After that press next

and here
you will find the location of the
The VirtualBox program on
the server, it is on C partition and then
Program Files folder and then Oracle
folder and after that VirtualBox
Folder you can change it from "browse" or
let it as default as shown here then
Press next

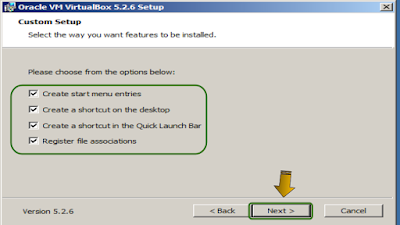
now let these settings as

now let these settings as
default as shown here after that press
Next
and now press "yes" to proceed

press

and now press "yes" to proceed

press
"install" to begin the installation

click

click
On "install" again to install the
VirtualBox network adapters

and this

and this
Is the final step in the installation,
press "finish"

No.2

No.2
In practical: Creating the VPS and Tuning its Settings
And this step will be
divided into two stages

stage 1: creating the VPS and
stage 2: tuning its settings

Now stage 1:
Creating the VPS

and now open the

and now open the
VirtualBox icon by clicking on start
Button then type "VirtualBox" and the
oracle vm virtualbox icon will appear
oracle vm virtualbox icon will appear
With you click on it

After that

After that
the program interface will be shown with
you

click on "new" to create the new VPS
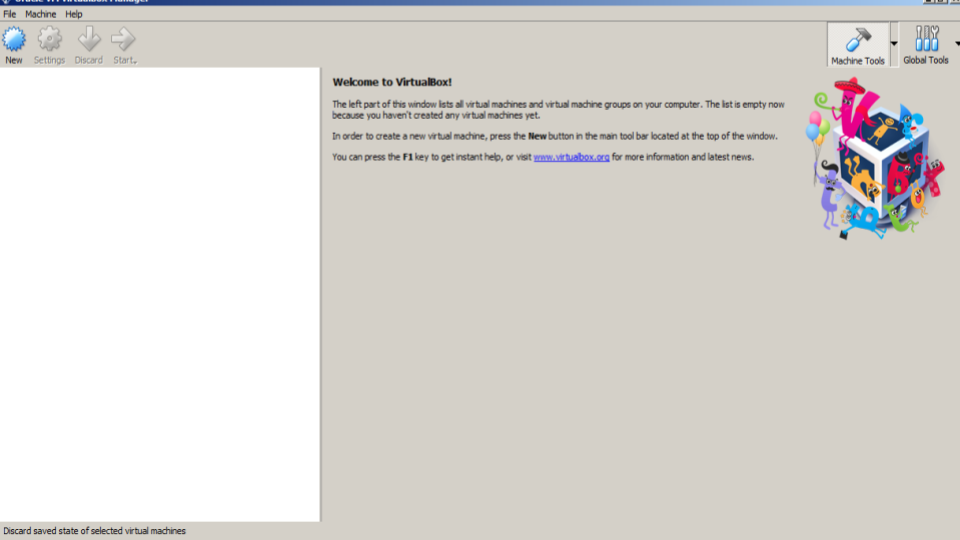
click on "new" to create the new VPS

now enter the VPS name for instance
"TestMachine"


at the type, you'll find the following operating
Systems types such as microsoft
windows and linux, solaris, BSD, IBM, MAC
And others, and here we will choose
"Microsoft Windows"

and your choice will

and your choice will
Be shown here next to type

and here in

and here in
the version you will find the versions
According to the operating systems that
you've chosen for instance you will find
As we chose Microsoft
Windows then you will find Windows XP,
Windows Vista, Windows Server 2008, Windows 7,
Windows 8, Windows 10
Windows 8, Windows 10
And others and here we'll choose Windows 7

After that, your choice will be shown
Beside version as shown here
then press
then press
"next"

And now choose the memory size of

And now choose the memory size of
the VPS for example here "1024" that means
one gigabyte, after that press next

Choose "create a virtual hard disk now"
and then press on "create"

choose the hard

choose the hard
disk file type the second one "VHD" so you
can use this hard with other
Virtualization software such as hyper-v,
and then click "Next"

And now the storage of the virtual hard
disk on the physical hard disk choose
"dynamically allocated" that means your
hard disk will use only a small space at
first and then will be increased
dynamically up to a maximum fixed size
After that press "next"

From here you can

From here you can
change the name of the virtual hard disk
And from here you can change the
location of this virtual hard disk on
Your physical hard disk, or let them as
default as here and from here you
Can change the size of the virtual hard
disk for instance
we've here entered 50 gigabytes after that
click on "create"


Stage 2:
Tuning the VPS settings

select the

select the
system machine that we've created after
that click on "settings"

At the left many

At the left many
categories will be shown with you at the
First category general you will find
basic, advanced, description and
The disk encryption and
in the basic category you can
change the name, type and the version
of this virtual VPS

the second tab

the second tab
Advanced, from here you can change the snapshot folder and the
Snapshot folder is a folder that
contains within the snapshot you take from
Your VPS, and the snapshot is a feature
you can make it on your VPS where you
Can take a snapshot of your VPS
at specific time to save all your VPS
Settings at this time, so you can
restore it if you face any issue and in
The shared clipboard you can click on
this arrow and the shared clipboard
is the process of copying and paste
between your server and your
VPS
Then click on this arrow beside shared clipoard

you will
Then click on this arrow beside shared clipoard

you will
find here these options: disabled,
Host to guest, that means you can make
copy and paste from the server to your
VPS and here guest to host, you can make the
copy and paste from the VPS to your
Server only, and bidirectional it's two
way that you can make copy and paste
From the server to the VPS and vice
versa, and so we will choose bidirectional

And now the 3rd option Drag&Drop, choose
also bi-directional so you can make a
drag-and-drop between your server and
the VPS and vice versa, drag and drop of
the files

in this tab "description" you

in this tab "description" you
can type a description of the of the
Operating system of your
VPS, also some settings such as the
CPU type and the hard disk size and the
memory size and others and this
Description will be shown to you as a
configuration file of your VPS in the
Form of comments

And the last tab "disk

And the last tab "disk
encryption" from here you can make
Enabling of the disk encryption so you can
encrypt all your virtual hard disk
Data

If you enabled this choice click

If you enabled this choice click
here on this arrow to choose the disk
encryption cipher

Here you will find two

Here you will find two
cypher protocols the first one
"AES 256" and second one "AES 128"
and here we will choose the first one
and here we will choose the first one
AES 256

After that type the password


After that type the password

now the system category you can
Find in this category 3 tabs
the first one motherboard and the
processor and the acceleration, and in the
"motherboard" tab you can change the
memory size from here and also you can
change the boot order from here from
These arrows you can make up and down and
you can check or uncheck these signs

The second tab "processor" from here you
can change the processor's core of your
VPS and here it's one core you can
change in up to 4 cores

Now the

Now the
Acceleration tab, from here you can
change the interface of your
Virtualization software you can install a
Virtualization software such as the
Hyper-v on your VPS, so click on this
arrow

here you will find these options

here you will find these options
None, default, legacy, minimal, hyper-v
and KVM for example, the minimal it's
used for Mac operating system and the hyper-v
is used for Microsoft operating system
and the KVM used for Linux and
So here we will choose "default" so the
program can choose a proper
Virtualization software on your VPS

And

And
make sure you have these settings enabled


And now the third the category display, you
can find here three tabs screen,
Remote display and the video capturing,
and in the screen
You can change the video memory size
from here and it's up to 128 megabyte

And now the second tab remote display
from here you can make "enable server" so
You can make access on your
server remotely so you can enter the
Server ports and allow multiple
connections

The 3rd tab "video capture"

The 3rd tab "video capture"
From here you can make enable to the
video capture, you can a make a video
Capturing on your VPS so you can change
the video file path from
Here also the frame size of the video
from here also the quality and you can
make enable of record audio
from here

And now Storage category you

And now Storage category you
Will find here Controller 1, the
controller which it's named SATA and
Type "AGCI" and it has two ports count, the
first port is for the hard disk
the virtual hard disk of this machine that
we've created, and the second port is for
The optical drives CD and from the buttons above you
can add another virtual hard disk and
From the buttons below you can add another optical
drive CD, also from here you can add
Another controller such as SATA controller,
also, you can remove the Controller

If we click here on the "TestMachine.
VHD", the virtual hard this we've
created you'll find some information
on the right side
such as the SATA Port 0 in the
controller also you can make it a
Solid-state drive, also some
information such as type "VHD" and the
Virtual size "50 gigabytes" it's the
maximum size, and the actual size here
102 kilobyte also details and the
location

Now if you click on the

Now if you click on the
Optical drive the CD you'll find
here the port number on the controller
That's the port 1 also it's a some
information and also you can click on
This arrow to choose an operating
system ISO file

Click on

Click on
Choose virtual optical disk file

Choose from your device the operating

Choose from your device the operating
System you want, such as here we will
choose "Windows 7.iso"

And the windows iso will appear to you as here

And now the

And the windows iso will appear to you as here

And now the
"Audio category" from here you can
make "enable audio" and from here you can
Choose the host audio driver and the
audio controller, also you can make
Enable audio output on your VPS audio
output and the audio input such as MIC
From here

Now

Now
The network category from the network
Category you can add 4 adapter s
1 & 2 & 3 & 4, in adapter 1, you can make
Enable network adapter
Also, you can in
Also, you can in
advance find the adapter
Type here "the network adapter type", also
the network adapter MAC address and
here the network adapter type you can
click on this arrow beside NAT

You'll find the different types of the network

You'll find the different types of the network
adapter such as NAT technology, NAT
Network, bridged adapter, internal network,
host-only adapter and generic driver
And the most popular is, the NAT: which is
meaning that your VPS and the
The server will have the same public IP
to get out to the Internet and the
to get out to the Internet and the
Bridged adapters that means,
Your VPS
Your VPS
adapter will be the same
adapter of the server "the same network
adapter of the server" and the
"Host only" that means your VPS will
have a different network adapter rather
Than your server, and here we'll choose the
NAT

The Serial Ports category you will

The Serial Ports category you will
Find here four ports you can add them
port 1 & 2 & 3 & 4
Also, serial ports are no longer much
used anymore,

And the USB

And the USB
Category, from here you can enable the
USB controller and it's type default as
"USB 2" also from here you can add any
other USB devices to your VPS


Shared folders category and this is a
very important category, such as from
Here you can click this square to add a new
shared folder that you can share the
Files between your main server and your
VPS

After you click on this you can first
add a folder Path, the shared folder

After you click on this you can first
add a folder Path, the shared folder
path from your
Main server and then the folder
Name for ex here:"E" will appear with you, after that
Click on OK

And the shared folders

And the shared folders
will be shown with you as shown
Also, you can manage
all shared folders from
Here

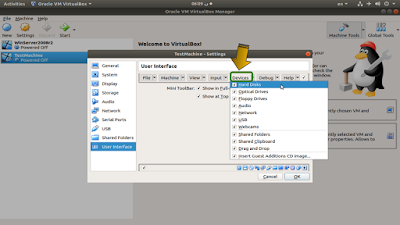
The user interface from

The user interface from
here you can choose the menu such
As file, machine, view, input, devices, debug
and help

If you click on "file" you will

If you click on "file" you will
Find here preferences, Network operation
manager, reset all warnings, you can check
or uncheck any of these settings

Also in

Also in
"machine" you can find settings as: take a
snapshot, pause
, reset, power off, save state and others

And in View you can show or unshow
full-screen mode, seamless mode, scaled mode
Or menu bar, status bar and video capture
,take screenshot all these settings

In "input" you can find keyboard and
mouse integration

in "devices" you can

in "devices" you can
Find such as hard disks, optical drives,
floppy drivers, audio, network, webcams USB
Drag-and-drop, shared clipboard and
shared folders
in "debug" you can find

in "debug" you can find
Statistics, command line logging, show log

And in "help" you can find contents,
Virtual website, virtual box bug
tracer and VirtualBox forms, oracle
Website and about VirtualBox

From here

From here
you can choose the Status Bar on your
VPS
and this is a quick launch icons such as
Boot from hard, boot from the optical
drive CD, boot from floppy disk and the
Audio card and the network card, USB
devices the shared folders and the
The screen
card, the video capturing and the
Hypervisor virtual software, the mouse
integration and the keyboard integration
On your VPS, after finish press OK


Now select your machine testMachine
That we've created and then press Start

The menu bar will be shown with
You above, and the status bar will be
shown with you below

And now we will

And now we will
Click on "F12" to select the boot device

After that press C from your keyboard to
Select the CD room that has the ISO file

And now your windows will be starting
With you

The screen of the Windows 7

The screen of the Windows 7
installation will be shown with you

The end of lesson 8
I wish itwas useful for any questions or
Inquiries kindly contacting me through
email, you can send me a
Screenshot of any problem you have, also
you can contact me through the social
Links or type your comment
and I will reply you as soon as Possible
and I will reply you as soon as Possible
in the next lesson, god willings will talk about
the database server
the database server


No comments:
Post a Comment