

In the name of Allah the entirely merciful the especially merciful

Peace be upon you and welcome in lesson 7
in Server Admin Course
in Server Admin Course
I am Muhammad Elnmr from SystemAC Blog & Channel
And this lesson is about " Mail Server "

And this lesson is about " Mail Server "

The content
in this lessonWe will discuss the following points
point 1: what is the mail server?
point 2: how does server become a mail server?
point 1: what is the mail server?
point 2: how does server become a mail server?
Point 3: mail sever most popular application types and
in practical
one: how to install the mail serverTwo: creating a post office domain and email accounts and
Three: making a test by sending a message from account to another

Point 1: what is the mail server?
It's a server that introduces electronic mail service
for transferring and transporting messages and files
for transferring and transporting messages and files

Point 2: how does any server become a mail server?
This achieved when installing any mail server application on

point 3: mail server most popular application types
in a Linux system
There is postfix, exim and others and
in windows system
in windows system
There are Microsoft Exchange, mail-enable,
Hmail and others

Hmail and others

Now the practical part
One: how to install the mail server
we chose here "mailenable" server and
we chose here "mailenable" server and
Two: creating a post-office, domain and mail accounts
Three: making a test by sending a message from one email
Three: making a test by sending a message from one email
account to another and

now number one in practical:
installing the Mailenable mail server on Windows Server 2008 R2
first of all on your server
Open your browser such as Internet Explorer and in Google search type
"download mailenable standard" and then
Click on "download mailenable" the first link

After that next to standard edition free
Press download as shown here. And now this page will appear

And your download will start
shortly

After the downloading window appears with you
Press save to save the program on the server

And now the application will be downloaded with
you as shown here, let it be completed
you as shown here, let it be completed

After the application is downloaded
right click on it and then choose "run as administrator"
right click on it and then choose "run as administrator"
To set up

And now press "OK" to give the mail-enable
The permission to access the internet

After that this screen will appear with you
let it be completed

After that this screen will appear with you
let it be completed

Before doing this step. It's strongly recommended that
you exit all Windows programs before running this setup program
after that, press next
you exit all Windows programs before running this setup program
after that, press next

Now enter name and company as you want and here I
typed Microsoft
then press next

Now, press next

Now select the components to install let these settings as defaults
as shown here and then press next
as shown here and then press next

Now select the destination folder
From browse from here, you can change the destination folder
of the mailenable on the server
of the mailenable on the server
but here we have only the "C" partition so
let it as default and then press next
let it as default and then press next

Also, let it as default as shown here and
then press next
then press next

Now the destination folder of the configuration file
of the mailenable you can change it from browse from here
Or let it as default in the "C" partition
and then press next
of the mailenable you can change it from browse from here
Or let it as default in the "C" partition
and then press next

Enter the post office name and password
as you want as shown here and
as you want as shown here and
Note: that the password should be complex
and then press next
and then press next

Select the location of the important folder post offices
and that folder contains all the mail messages of the mailenable
and that folder contains all the mail messages of the mailenable
from "browse" here
you can change it, or
Let it as default the as shown here and then press next

After that enter a domain name as you like as shown here and
Then enter the DNS server and here I've entered
"Google DNS server: 8.8.8.8"
"Google DNS server: 8.8.8.8"
And then the SMTP port or mail port
and it should be as default 25, and then
and it should be as default 25, and then
press "next"

Now press "next" again

This screen would be shown with you


Now let this loading completed

And here is the configuration
of the mailenable on the IIS web server
Let it on the default website as shown here

And here is the configuration
of the mailenable on the IIS web server
Let it on the default website as shown here
And this page will
Appear you the page of the mailenable that you
will enter your email and your password in
will enter your email and your password in
After that, press next

Now this installing window will appear with you

Now installation complete so click "finish"

After you finish the mail-enable welcome page will appear
with you as shown here. You can close it

After that open
with you as shown here. You can close it

After that open
The mail-enable icon by clicking on the start button
and then type mail-enable and then the mail-enable
icon will appear with you
and then type mail-enable and then the mail-enable
icon will appear with you

This is the final step of installing
the mailenable you can use it now
the mailenable you can use it now

No.2: creating a post office, domain and mail accounts

open the mailenable manager icon once again as
shown

From the plus sign at left expand the "messaging manager"


"Post offices" will be viewed now
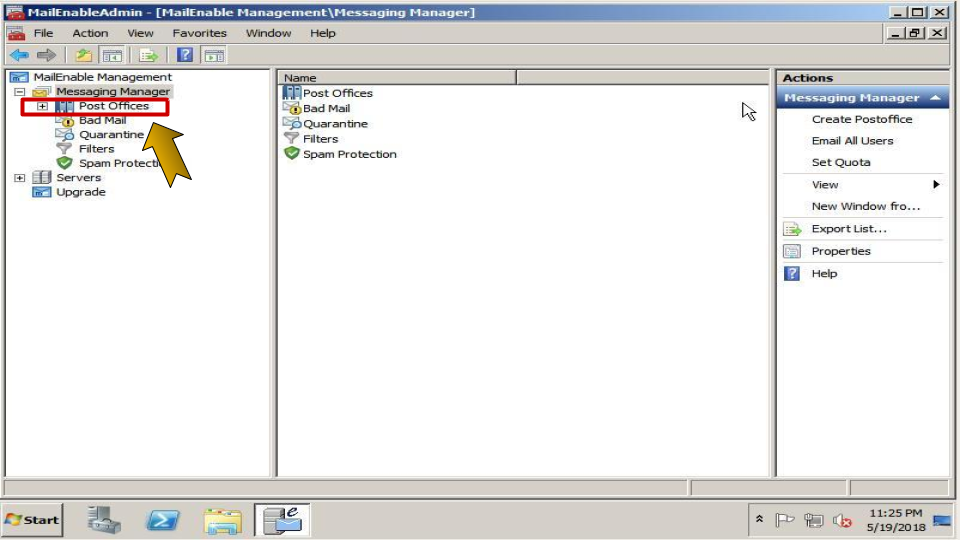
Right click on post offices and choose "create post office"

Enter the post office name
For instance "test.com" and then enter a complex passwordYou can use "random" to create a complex one
After that click OK

Now under post offices, you will find the "test.com"
post office that we've just created

Now creating the domain first expand "test.com"
post office and then right click on domains, and
post office and then right click on domains, and
Then select "new domain"

Enter the domain name for example "test.com"
and then click "OK"
Note that the post office is like the whole company
which could involve many domains

and then click "OK"
Note that the post office is like the whole company
which could involve many domains

Now, press "yes" to add an alias email for this domain
for each mailbox in this post office
for each mailbox in this post office

Creating the mailbox right click on mailboxes
and then choose "new mailbox"

and then choose "new mailbox"

Enter the mailbox name for example here "Ahmed"
and then enter the password, and
and then enter the password, and
Then mailbox type choose "user" after that click "OK"


Repeat the previous step to create another mailbox "Ali"
at "test.com" right click on
mailboxes and then choose "new mailbox"
at "test.com" right click on
mailboxes and then choose "new mailbox"

Enter email name for instance
"Ali" and then enter "its password"
"Ali" and then enter "its password"
And it should be a complex one that contains
capital and small characters
Numbers and special characters and
then choose type user after that press Ok
then choose type user after that press Ok

And now click on "mailboxes"
You should see 3 mail accounts "Ahmed and Ali"
that we've just created and the third one
that we've just created and the third one
Postmaster that's automatically created
when we created the domain
when we created the domain

3- sending a message from one email account to another

In the last screen when you click on "mailboxes"
The double-click on "Ahmed" and "Ali" to
show the properties of these mail accounts

show the properties of these mail accounts

The important thing. I wanna show is the username
for these mail accounts, where there are :
for these mail accounts, where there are :
"ali@test.com" and "ahmed@test.com",
now you can close the mail-enable manager
now you can close the mail-enable manager

And then open the IIS web server manager
as shown here

Under "sites"
as shown here

Under "sites"
You can see the mail-enable websites mail-enable
web-admin and mail-enable web-mail, and the important one is
web-admin and mail-enable web-mail, and the important one is
The last one "mailenable web-mail" that we will need

Now click on mail-enable web-mail and then click on
"browse mail-enable webmail.." from here
"browse mail-enable webmail.." from here

Here enter the first email account "ahmed@test.com"
and then enter its password
and then enter its password
After that, press "login"

Now double click on "inbox"


Now double click on "inbox"

Press the arrow beside new and
then click "email message"
then click "email message"

Enter the second email account "ali@test .com"
and then enter the subject
and then enter the subject
For ex:"TestMessage" and then click "send"

Now log out from the first email account "ahmed@test.com"
By click on the arrow from here and then press "log out"

Now press "yes" to assure from logging out


enter the second email account "ali@test.com"
and then enter its a password, and then
and then enter its a password, and then
press "login"

Now press inbox to see the first message that we've sent
from the first email account "ahmed@test.com"
from the first email account "ahmed@test.com"

Make sure that the Test-message from "ahmed@test.com"
is received here as shown and
Note that:
is received here as shown and
Note that:
The mailenable is sending from two internal accounts
from "ahmed@test.com"
from "ahmed@test.com"
To "ali@test.com" at the same mailenable server
So it doesn't need any DNS server
But when we need to send from an email account on this mailenable
server to another email account on other mail server
server to another email account on other mail server
We need to use the "DNS server" and
we will explain that later God Willing
we will explain that later God Willing

This is the end of lesson 7
I wish it was useful for any questions or inquiriesKindly contact me through email social links
or type your comment and I will reply
you as soon as possible in
or type your comment and I will reply
you as soon as possible in
The next lesson god willing we will talk about
the "VPS server"
peace be upon you

the "VPS server"
peace be upon you


No comments:
Post a Comment