

Lesson 3: Web server | what is the web server

In the name of Allah the gracious the merciful

peace be upon you
welcome in lesson3 in The Server Admin Course
this is Mohamed elnmr from SystemAC channel
this lesson is about web server

Content
in this lesson we'll talk about the following pointspoint 1: what is the web server?
point 2: how does any server become a web server?
point 3: web server application types
In practical
1- how to set up a web server?2- how to make a website on it?
3- how to give permissions to users to access the site?

point 1: what is the web server?
it's the server that gives the service of websitesby uploading the website files on it
then allow users to access these files through the web browsers
these are some of the most common sites
such as Amazon, youtube, and google
of course, each one of them has a particular web server

point 2: how to make a web server?
we could make any server to be a web serverby installing any web server application on it

point 3: web server application types
in Linux system: there areapache web server and Nginx web server and others
in windows system: there is
the IIS(Internet Information Services) web server

Practical
1- we'll take how to install the web serverwe chose here the IIS for example
2- we'll make a website on the IIS
3- we'll give permissions to users to access this website

1- installing the IIS web server
on windows server 2008R2

First: open the server manager
by double click on this icon

After that: select Roles
then click on Add Roles

Now click next

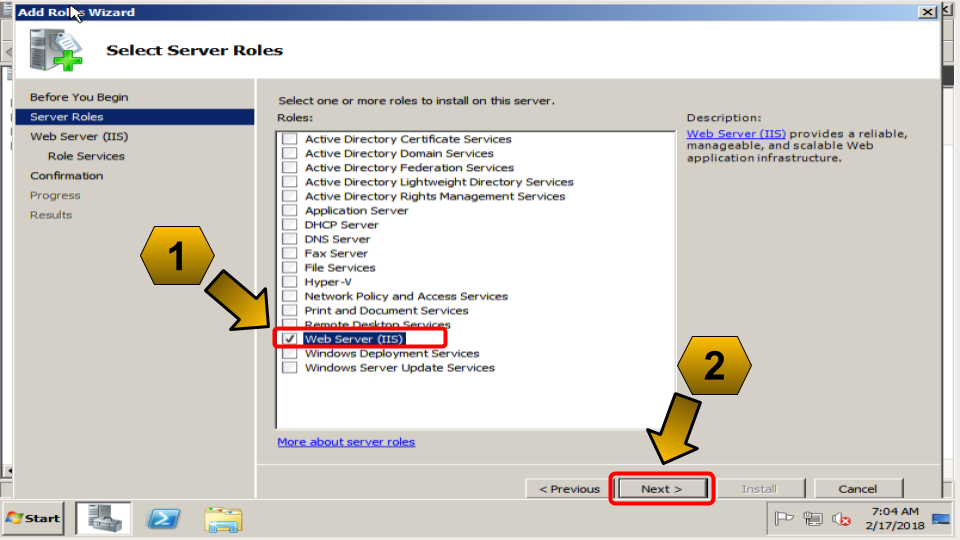
Select the web server (IIS)
Then click next
After that click next again

let these settings as default now
then press next

Now press install

Your installation will be proceeding now

After this word appears
then the installation is finished
Click close now

Open the IIS manager
As we mentioned before
By clicking on start then type IIS
Then double-click on the IIS manager icon

This is the final step
The IIS web server is ready for use

No.2 in practical
Creating the website on the IIS web serverWe will divide it into 3 stages
Stage 1: putting the website files on the server
Stage 2: putting the website domain name in the hosts' file
Stage 3: creating the website on the IIS manager

Stage 1:
putting the website files on the serverOn the path: C/Domains/"Website Name"/wwwroot

double click on the partition C

After that: Right click and make a new folder
With the name "Domains" as shown here

Then make a new folder with the website name
For example here "test.com"

Then make a new folder with the name "WWWroot"
This is the last folder and wwwroot
is the common name for the last folder
For any website at most web servers

Now upload the website files here
Or copy and paste it

Stage 2:
putting the website name in the hosts' fileNote that: this step we can ignore it
if we have a real domain
that we've already bought it

Open the path on the server
Partition C then folder windows
then folder system32 then folder drivers
then folder etc
the hosts' file is the first one

Now right-click on the hosts' file
then choose open

Choose the notepad to open it
Then press OK

Type and add this line:
127.0.0.1
this is the fixed localhost IP
then type www.test.com
that means we've told the server that
when we type "www.test.com"
then ask the web server on this local web server
On this local machine

Stage 3:
Creating the website on the IIS manager
First: open the IIS manager
As we mentioned before
As shown here

Then right-click on the word "Sites"
At the left-side
Then choose Add Web Site

First: enter the website name
for our example here is: test.com
Then click this square to choose the website path

Choose the website path until you reach
the wwwroot folder
that the website's files are putting in
then press OK

Now: enter the hostname: www.test.com
That we've added in the hosts' file
That we'll use it to open the website
Then press OK

Now: we will test the website on the server
Right-click on the website name
For our example "test.com" at the left-side
Then choose Manage website
Then choose Browse

Make sure that the website default page
Is opening with you as shown here
With the hostname: www.test.com

No.3 in practical
Giving permissions to usersAccess the site from outside the server
We will divide it into 4 stages
Stage 1: giving the authentication from inside the IIS manager
Stage 2: knowing your machine(web server) IP Address
Stage 3: Putting the website name in the hosts' file
Stage 4: try accessing the website from outside the server

Stage 1:
giving the authentication from inside the IIS manager
First: click on the website name here "test.com"
Make sure you are on test.com Home
and then double-click on Authentication

Select the Anonymous Authentication
Which is the authentication for any usual user outside the server
Then press Edit

Choose the "Application pool identity"
Then press OK
That means: any user requests this website
From outside the server
Will use the user & password for the application pool
We'll talk about the application pool in the next lessons ISA

Stage 2:
knowing your machine(web server) IP Address
Open run window on your server machine
By clicking on the start button
Then select run

Type "cmd" then press OK
To open the command line console

Type the command: ipconfig
Then press Enter

Your server IP is showing here
192.168.1.12 next to IPV4 Address

Stage 3:
on our device outside the serverPutting the website name in the hosts' file
Note that: as we've mentioned before
This step we can ignore it
If we have a real domain
That we've already bought it

First: opening the hosts' file on any windows machine
Like Windows 7, or Windows 8, or Windows 10

Open the path as shown here:
Partition C then folder windows
then system32 then drivers then etc
The hosts' file is the first one

Right-click on the hosts' file
Then choose Open

Add this line:
192.168.1.12 www.test.com
then save this file

Open the cmd on your device
Then type: ping www.test.com

Make sure that the www.test.com
That we've added in the hosts' file
Is pinging from the same web server IP
As shown here

Now: adding the website in the hosts' file
In any Linux machine like Ubuntu 17.10

First, open the terminal icon as shown here

Now type this line: sudo nano /etc/hosts
Then press enter

Add this line as we mentioned before
Then save the file

Type the command: ping www.test.com
Make sure that it's pinging from the same server IP

Stage 4:
and the last stageTry accessing the website
On our machine outside the server

Open your browser and type: www.test.com
Then press Enter

Make sure that the website file page
Is opening with you as shown here

The end of lesson3
I wish it was usefulFor any questions or inquiries
Kindly contact me through
The social links
Or type your comment
I will reply to you as soon as possible
In the next lesson InshaAllah
We will talk about the DNS server
Peace be upon you


No comments:
Post a Comment