

Lesson 6 | VPN Server | what is vpn used for | vpn meaning

In the name of Allah the gracious the merciful

peace be upon you and welcome
In lesson 6 in Server Admin Course
I am Muhammad Elnmr from SystemAC Blog & Channel.
And this lesson is about the VPN server

The content:
this lesson will contain the following points
point 1: what is the VPN server?
Point 2: how does any server become a VPN server
point 3: VPN server most popular application types and
In practical part:
1- how to set up a VPN server
2- making a test by creating an account and a secure connection

point 1: what is the VPN server?
it's a server that makes a virtual secure connection
between any device and the server and so
The connected device is being considered a member
of the private network of
The server and it gets out to the internet
through the server public IP
For example, if your device connected through the internet
through a VPN connection with the VPN server
It will be a member of the private network of this VPN server

point 2: how does any server become a VPN server?
It will be achieved when we install any VPN server
application on this server

point 3: VPN Server most popular application types
in Linux system:
There is the Open VPN, and in windows system:
There is the Softether VPN Server

the practical part:
and we will take the following
1- how to install the VPN server
we'll choose here the Softether VPN server
2- making a test by creating an account and
opening up a secure connection between our device and the server

no.1- installing the softether VPN server on
windows server 2008 r2

first, open the Google search and type
Download "Softether VPN server"
and then
double click on downloads Softether VPN project and

Now click on "Download Softhether VPN"

and now select the following
first "Softether vpn(Freeware)" and in the component select
"softether VPN server manager for Windows" and
in platform select "windows" and in CPU let it Intel
X86 and x64

After that, Scroll down in the same page and then
double click on " softether VPN server and VPN bridge

and if you have a Google Chrome browser
Your download will be shown as shown here

And in Internet Explorer browser
The download will be shown as here after the program is downloaded

on your server then right click on it and choose run as administrator

And now click Next

Select Softether VPN Server and then click Next

Check on I agree with the License Agreement
and then press next

After that click Next again and

Now select the installation part of the Program on your server
and it's preferable to be as default in the C partition
and then click Next

After that click Next again

When the installation completed this screen
will appear as shown here
Finally, press finish

This is the last step and the
final screen of the softether VPN server manager
on your VPN Server

No.2 in practical creating an account
and opening up a secure connection between
our device and the server
Note that: this step we will be divided into five stages

Stage 1:
creating a new connection with a virtual hub and a user
now open up the softether VPN server manager

By clicking on the start button and then double click on
softether VPN server manager

After this screen appears
click on "new setting" and

And now enter the following settings in setting name
type: "connection 1" for example
And in hostname type: "localhost" and the port number
choose "5555" and
Choose "virtual hub admin mood" and then
Let it as default as shown here, after that
Click "OK"

Choose the connection 1 that we've created
and then press "connect",

After that press "manage Virtual hub"

and now Press on "manage users" to add a new user

here enter the username for example: "testuser"
and then enter the password and confirm it again and
Then Press "OK"

and then click on "OK" again

Make sure that your new user
Is shown here then press Exit

Stage 2:
"Enabling NAT Technology"

Again select the connection1
that we've created and then press connect

After that Press manage Virtual hub again

And then press virtual NAT and virtual DHCP server

After that click on "enable SecureNAt" and, then press on Exit

After that press OK

Stage 3:
Opening the firewall ports

open up the Run window
on your server and then type "wf.msc"
And then press OK

Select inbound rules and then click on new rule

Select "Port" from here and then click "Next"

Select specific local ports, and then type the same port "5555"
and then press "Next"

Select allow the connection and
Then press next

leave these settings as default as shown here
after that, press "Next"

finally, enter the name
For example "VPN Ports" and
Then press "Finish"

Stage 4:
installing the VPN client on your device to open up
a VPN connection with the server

Open the Google search on your device
and then type "download SoftetherVPN client" and then
click on the first link "download softether VPN project"

Click on "Download SoftEther VPN"

select the following in software select
"SoftEther VPN(Freeware)" and in component
select "SoftEther VPN Client", and the Platform
"select windows" and
the CPU, Let it " Intel x86 and x64 "

After that scroll down on the same page and then
click on "SoftEther VPN Client " as here
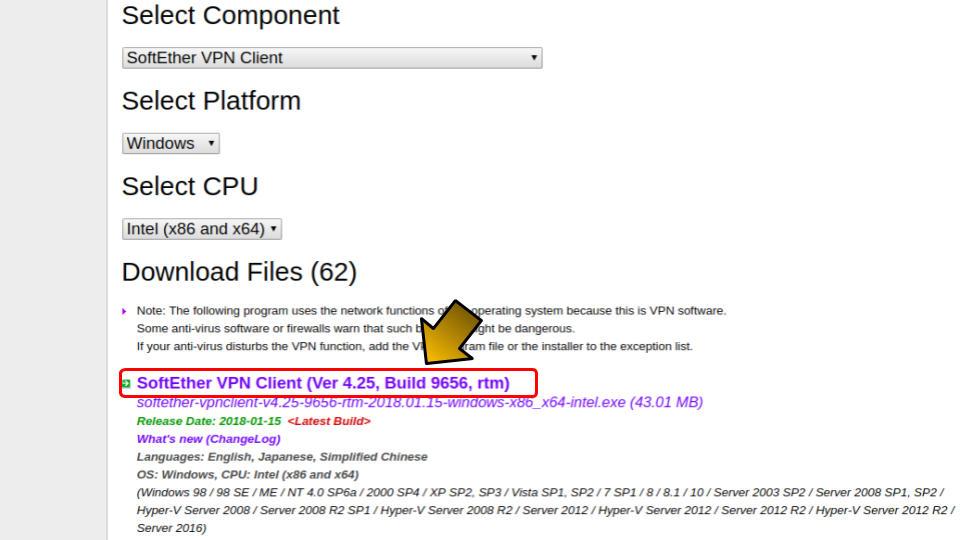
Your download will start as shown here

After the program is being downloaded
Put it at the desktop

And now right-click on the program
and then press "run as administrator"

After that, click Next

Now select
"SoftEther VPN Client" and then press "Next"

Check this option. "I agree with the Licence Agreement"
then press "Next"

now click "Next"

After that
Leave that installation directory in the "C Partition"
as shown here or change it as you like after that press "Next"

The installation will be preceded with you as shown here

Once completed as shown here Press "finish"

stage 5:
making the secure connection

firstly make sure that your device and the VPN server
is seeing each other by opening the "CMD" and
type the following command
"ping space and the IP of the
VPN server" and make sure that it's replying on you
as shown here

And now Press the "Start" button and
Open "the SoftEther VPN client manager as shown here

And after that, this console will appear with you

Now right-click and then choose "New VPN connection setting..."

And then press "Yes"
To create a new virtual network adapter

Now type the name of the new virtual network
adapter and for example here
"VPN", and then press "OK",

It will load with you as shown here

After Completed enter the following settings
in setting the name enter for example "testVPN"
and the hostname
Enter "the IP address of the VPN server "
and in port number choose "5555",
and the virtual hub name
Let it "default" and
Then enter the username "testuser" as we've created before
and enter the password also
Once finished, press "OK"

And now right-click on the "TestVPN" that we've created
and then choose "connect"

This window will appear
with you and that means
The server has assigned you a private IP address as shown here
Then press "close"

And now the VPN is succeeded and for more clarification
You can go google search and type
"What's my IP address?" And then choose "What is my IP address"
the first link

You will find the following
Your public IP will change to "server public IP"
and also the location will change to the VPN server location

The end of lesson 6
I wish it was useful for any questions or inquiries
Contact me through the Social links
or type your comment and I will reply you as soon as possible
In the Next Lesson. Inshaallah. We'll talk about
The Mail server and peace be upon you


Thank you so much for the post you do. I like your post and all you share with us is up to date and quite informative, i would like to bookmark the page so i can come here again to read you, as you have done a wonderful job.WPNeon.com
ReplyDeleteIf you are looking for more information about flat rate locksmith Las Vegas check that right away. 2021翻墙与科学上网指南
ReplyDeleteGreat article Lot's of information to Read...Great Man Keep Posting and update to People..Thanks Kanādas vīza tiešsaistē
ReplyDeleteVery efficiently written information. It will be beneficial to anybody who utilizes it, including me. Keep up the good work. For sure i will check out more posts. This site seems to get a good amount of visitors. bestvpn
ReplyDeleteprywatnoscwsieci This is a wonderful article, Given so much info in it, These type of articles keeps the users interest in the website, and keep on sharing more ... good luck.
ReplyDelete