


In the name of Allah the especially Merciful, the entirely merciful

Peace be upon you,
Welcome to the tenth and last lesson of the
learning servers lessons playlist
, With you, Mohammed Al-Nmr
from the System Administration Channel (SystemAC),
and this lesson will be about the control panels of servers

Lesson content
In this lesson, we will discuss the following set of points
1) What are the control panels of servers
2) What are the most popular types of control panels
3) Advantages of control panels
In practical: we’ll explain
first) How to install the Control Panel
second) Perform a test by creating a control panel
and connecting it to the server

The first point: What are the control panels?
Control panels are panels which control
all the server applications such as (Web, FTP, DNS, Mail,...etc)
so that they all can be managed from one place
through an easy web page interface.

Second point: control panels most popular types
For Linux systems, there are cPanel, Vesta, and others
For Windows systems, there are
the Plesk control panel of Microsoft, solid, and others

The third point: the advantages of server control Panels
The first thing is the ease of managing server components
& applications from one place through the web
The second thing is that: When the server is shared
between multiple customers,
You can give each customer an account on the control panel,
So that he can manage only his data such as(website, mail,...etc)

Now practical
and we will explain the next
First: How to install the Control panel
we choose here (Solidcp)
Second, we will do a test by creating the control
panel and binding it to the server

1- Installing the(Solidcp) Control Panel on
Windows Server 2008 R2

This step is divided into two phases:
now the first stage, Downloading Prerequisites or the
necessary programs before the control panel Installation
And Here is the Web-deploy program

Open the browser on the server,
then in the Google search engine Type:
“download solid”
Then after the results appear
click on the first link as shown in the picture

After opening the link and entering
the solidcp site, click Manuals above
Then goto the "Install solidcp standalone
server within 5 minutes" button and click on it

It will convert you to a page that explains how the solidcp
of standalone type is installed on a separate server
which means that the control panel components
all will be on the same server, as the components
can be partitioned on more than one server, and then
scroll down until you reach the word "Prerequisite"
Underneath you will find the necessary requirements
for the control panel,
Such as, you should have a Windows Server 2003
or higher version, and you must have at least SQL Server 2005
or higher, and there must be a web server like IIS because
the control panel needs all of these at the beginning
and you will need to install a specific program
You will click the link on the next picture to download and install it
which is the web-deploy program

After clicking the previous link you will see this page
click “install this extension”

Now click on download

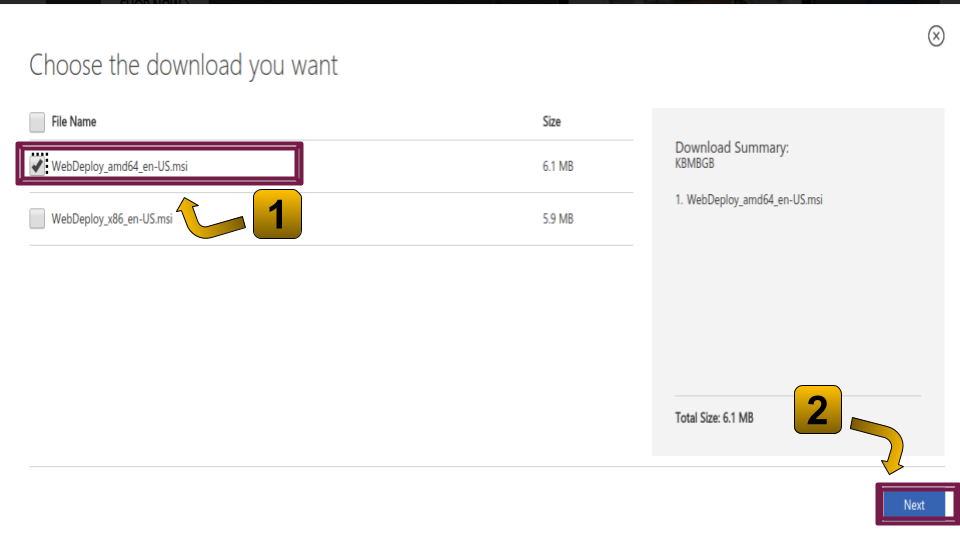
Check the box beside web-Deploy 64 bit according to
the version you have on your server if it is a 64 version
If you have version 32 bit you will place a mark on the
second choice, which is the 32-bit version
Then click Next
The download will now start with you according to your browser

After the download is complete
Set up the program by right-clicking
on the program icon and then press
Install

Now click Run

Then click Next

Check to accept the terms and then click Next

Choose the setup type
to be the first type “Typical”

Then click Install

The setup will start with you now, let it complete

Now click Finish

Stage 2: download and install the control panel itself
which is SolidCp

Open the solidcp site page as we opened it before
using Google search engine or directly enter
the URL “www.solidcp.com/downloads” and then
click download solidcp as shown

The program will start downloading with you now

After downloading the program
right-click it and choose
“install” to start its installation"

Press run

Accept the terms and then click Install

After the setup is finished
Click Finish

Now we will open the program,
click the start button and then
type in the search below“solid”
that will appear you the program icon
above so click on it

Press “View Available Components”
to show you the control panel components

Now you see the appearance of the components
click on install for the first choice
Solidcp Standalone server
Because we want to set up all the components
on this server and not one component as below

Now the setup will start with you, leave it to complete

After the previous setup completes, click Next

Then press “I Agree” to accept the terms

Now the program will discuss the possibility of installing it
on the server and if found a problem
will appear you a mark x next to it
This means that you need this service on your server
In the case that there is no problem as here
in the picture, go ahead by clicking Next

Now you will see this screen, which has important settings
such as IP address and you will find it automatically
wrote the IP address of your server, then in the port
you will find it’s 9001 as here, and prefer to leave these settings
as they are unless you want to change to another IP address
or Port as you like
Then here in Hostname you can type your domain name
so that you can access the control panel thereby
But here I will leave it blank because we will enter through
the IP address and port as shown here in the picture
Then click Next

Now the DataBase settings for this control panel
because most of the control panels need their own database
which has its own settings and data
For this reason, there must be a database application
such as SQL server as here
Now in the address of the SQL server
we will leave it as it is in the default mode
ie it will enter the same server on the sqlexpress instance
In the method of entry or authentication, you will choose
Windows Authentication. As we explained before, this means that
you will use the current Windows user to access the DataBase instance
Then in DataBase, you will find the DataBase name that will be
created for the control panel with the same name as solidcp and
you can change it as you like or leave it as it is
Then click Next

Now the password screen,
you will find the username “serveradmin”
just like in the picture here that is a static username
of the control panel, which has all the privileges on it
you will write the password you want to and
it should be complex, and then click Next

Now the download will start again
with you let it complete

After the download completes, the word Next
will be activated, so click on it

And now it tells you that you have two users
are created for you automatically so
you can manage the control panel completely
through them, they are the user serveradmin,
which has the highest powers and can create
or delete any other user
The second user is admin and this user
has almost full powers but can not control
or delete the serveradmin user, then click Finish

Now you will find the components of the
control panel that has been stitched to
the left here as well as the image
and they are three components
Solidcp server, solidcp enterprise server
solidcp portal and the component we are
dealing with is the latest portal component
whereby we open the web page of the control panel
Now you can close this window

Now we will open the IIS web server
Click on the start button and then
type iis and you will see the
IIS Manager icon appears above

On the left, you'll see the three sites
for the Control Panel components
as we explained earlier

Now we will select the solidcp portal
we will deal with and then on
the right we will click on
Browse to open the
web page of the control panel

The control panel page will appear with you
as the picture, first, notice that the page address
is the IP address of the server + port number
of the control panel program that is 9001
Then type in the username, serveradmin,
and type the password that you previously selected
Then click on login

And now you will see the main interface
of the control panel solidcp, which you
can control the components of your server

Now the second point in the practice is:
Testing and Binding the control panel with
our server components or applications
in order to manage them

This second step is divided into three stages
now the first stage connecting
the server itself to the control panel

First: Open the web page of the control panel
as we opened earlier or by typing the IP address
and port in the browser and pressing
Enter from the keyboard
Then type the serveradmin username
and password as we did before that
Then click on login

Now you will find the main menu at the left
and you will find a set of important choices:
Account Home, Account Menu, Reporting
Scheduled Tasks and Configuration
Each of them has a specific role in the control panel.

Now before connecting server services and applications
be sure to connect our server itself to the
control panel by going and clicking the arrow
next to the selection of configuration
Then click on the servers located below it

And now you will see this screen
first you will find it automatically added
your server, which you installed the
control panel on, and gave it the name my server
as shown here, and through add server here
you can add a new server to connect this control panel
but here we will make sure only the settings
of the current server Because it is already
added so we will click on the settings from here

Now you will find the name of the server
and you can change it as you like and at the bottom
you will find important settings for the server
Such as Connection Settings, Active Directory settings
Preview domain, and Ip Addresses
Services and DNS Records Template
Each of them has a specific function
but here we will leave the default mode to all and
only choose the Services option to add services
or server applications on the control panel
So we'll click the + sign here on the right of Services

You will now find most of the services
that you can add from server to the control panel
for example, you will find in the system
or operating system, we find here that he automatically
added the version of Windows server for our
server and gave it the name OS,
Then in the service of websites, It will also
automatically add the IIS web server on our server
and give it the name web
But here, for example, we'll find the FTP service
and not added, so we'll add it

But first before adding the service we need to know
the type the FTP application version, because
we will need it in the control panel, so we go
to the server and press the start button and write
FileZilla and then click on the icon of the FileZilla server
that will appear above to open the application of our FTP

Click on the question mark above and
then click “About Filezilla Server”

You will find the type of the Filezilla version
written here that is 0.9.60

Now go back to the control panel and press the
Add button to the right of the FTP service

In the first line, you will type the service name
For instance: FTP and then in the Service Provider
will choose the application Filezilla with its version number
as we knew it that is Filezilla FTP Server 0.9
Then click “Add Service”

You will find that you have created a DNS record
and will not need it here as this record
is just a template we can use in the DNS when
we connect it to the control panel but here we will not
connect the DNS server so we will not need it
You can delete it from the red mark with
the right or leave it as it Is, and then click “Update”

Now the FTP service has been added
to the control panel and you will find
its name “FTP” as shown
, And then we will add another important
service which is the Mail service, so
click Add here to the right of the word Mail

Type the name of the service
for example “Mail” and then the name
of your server application
Select “MailEnable Server”
As in the image, and then press “Add Service”

Now you will also see the DNS record template
that you can leave as it is and
then click on “Update”

Now After adding the FTP & Mail services
you can go to the service page and see
the other services, and note that it automatically
added the service SQL server under the
type assigned to it because it’s “SQL server 2008”
If you have another version of the SQL Server
or another release such as 2012 or 2016 or
other you can add them from the services here

Also on the page, we find that we can
add other services such as MySql Database 4 or 5

Also, we can add the DNS service
and also the Hyper V service in

At the end of the services, page
click on “update”

Now you will find under our server “My Server”
all the services added that is the OS service and the
web service “web”, and the service of the FTP
and Mail, which we added, as well as the
service of the SQL server Database

The second stage is the creation
of a hosting plan, a plan that enables
us to determine the number of services we use
For example, it is possible to make three of
hosting plans, where the first plan, allows five
gigabytes as a disk space and the establishment
of two Web sites only and the creation of only
one database and the creation of 20 e-mails only
And the second plan includes for ex: ten gigabytes
of space and five Web sites and five databases
and an endless number of emails and so on
and then can be created a users group and
each user give him the appropriate hosting plan as required

Now on the left, we will click on the arrow
next to “Account Menu” and click
on the “Hosting Plans” under it

After that, we can create a new
hosting Plan on the control panel from the button
“Create Hosting Plan”, but here we will find
that it has created a default Hosting plan
automatically and made its name “My Server”
so we will click on it to see the settings inside

First, you will find the name of the plan
at the beginning and you can change it to any name
you want, then you will find in the target server
the same server, which was also created automatically
with the same name of the plan that
was “My server”, note that the plan
name and the server name here is the same
with the name: "my server" so that
you don’t get confused
And then the last and important choice
here are the “Quotas” that means dividing
the shares of this plan or its possibilities
so we will click on the + sign
to the right of the word “Quotas” as here

Now in the system, we can choose
what we want in this plan and
we will find, for example, it is here
In the hard disk space, we can delete the sign
here next to it and write a certain size in megabytes
and also in the bandwidth, we can determine the speed of
data transfer with a certain number such as 100 MB
instead of unlimited and also the number of domains
for this plan can be determined and so on
but here we will leave the settings as it is
On the bottom, you will find the quota for websites
such as the number of website in this plan
also, Activate or deactivate certain properties
for websites such as asp.net, PHP, and others.

By accessing the FTP service, we can also place
an unlimited sign here, meaning that the user
associated with this hosting plan can make an infinite
number of FTP accounts
And also for Mail service
We can set it by 1000 mail account only allowed
for this plan, the maximum size for each mail
is only one gigabyte, as shown here

And also in the share of the DataBase SQL Server 2008
we find that it is not limited to the number of databases
that are created and the number of users for each Database
and also an unlimited size of for each DB and so we
can change these settings as we want or we can make
more than one hosting Plan by the settings
that We want it
Then press “Save” when done

Now Stage 3: Create a new user on the
control panel and link it to the previous hosting plan
“My Server” that we have modified in its settings

From the left and under Account Menu
click on Customers, and you will find
the user that was created automatically
that’s “admin” user as shown here we will leave
it as it is, and we will create a new user
by clicking “Create User” from here

First, in the username, we will write
the name we want for ex: “testuser”
and then we write the password and
repeat it again
And write the first and last name and then
write the email of this user and can write any
special email for this user even if it
is on Gmail or Yahoo or others

Now by pressing the + sign next to contact information
we can add some contact information for
this user such as phone number and etc
Or leave it as it is
Then press “Create” after you finish

You will find information on the right of the user such
as his name, email, etc. You can edit it
change its password, or even delete this user
Now this user needs to be linked to a particular
hosting plan so We will click “Create Hosting space”

Choose the appropriate hosting plane for this user
Here is the plane that we’ve modified “My Server”,
Then leave the Hosting space status
for this user on “Active” because it can be
stopped temporarily or disable his account from here,
Then you must type any domain name
of this user, for example, “test.com”

On the bottom of the page, we can put a sign
here next to Create Web Site to create a website
linked to the same domain you typed, and also in the
FTP you will find it in the Default Account that will
create an automatic FTP account for this user with
the same username, and for the Mail also
you can leave it as it and you can
add any mail account after that
Then click “Create Space”

Now you will find the settings of this user
according to the hosting plan “My Server”,
which we chose for him
For example, it is not limited in the area on the hard
or in the Bandwidth and it has one domain of
an infinite number of Domains and also an infinite
number of subdomains and Domains are like “test.com”,
whereas Sub-Domains are such as “a.test.com” or
“any name dot Test dot com” and so on the rest of the settings
and then click on the username “TestUser”
at the top here to enter his account

Now you will find that through the account
of this user, you can control all the services on the server
For instance, You can add a domain or an
FTP account or a website or a mail account and so on

Thus the end of the tenth and final lesson
I wish it was helpful for all, and when you have
any questions or inquiries you can contact me
via e-mail or through social media pages
or by writing a comment,
See you in the next playlist, InshaAllah
Peace, mercy, and blessings of God be upon you

You can see this lesson's video from Here

No comments:
Post a Comment