

Lesson 5: FTP Server | FTP protocol

In the name of Allah the gracious the merciful

Peace be upon you
Welcome to lesson 5
The Server Admin Course
I'm Mohamed Elnmr from SystemAC Blog & Channel
This lesson is: FTP server

The content of this lesson
In this lesson, We will discuss the following points1- what is the FTP server
2- how does any server become an FTP server
3- FTP server most popular application types
In practical
We will take1- how to set up the FTP server
2- creating an FTP account
3- Testing this account

Point 1: what is the FTP server?
It's a server used for transporting filesfrom and to the server
The most common use:
Is to transporting websites files to the server
So, it usually exists with the web server at the same server
This picture is showing that:
When we're transporting files
from the client device to the server
we need the FTP protocol
The files & images are transporting across this FTP protocol

Point 2: how making an FTP server?
This will be achievedWhen we install any FTP server application on it

Point 3: FTP server most popular application types
In Linux system: there is the VSFTPDIn windows system, there is the IIS FTP and the Filezilla server
that's showing in this picture

Now the practical part
1- how to install the FTP serverWe chose here the Filezilla server
2- creating an FTP account
3- Transporting data and testing this account

No.1- Installing the Filezilla FTP server on
windows server 2008 R2

First: download the Filezilla FTP server application
Goto google search and type: "Download FileZilla server"
Then double-click on the first link here:
Filezilla- The free FTP solution

Now: click on "Download Filezilla server"

After that: this page will appear
Click on "Download Filezilla server"
Under "windows" word

Your download will start with you as shown here

After the download completed
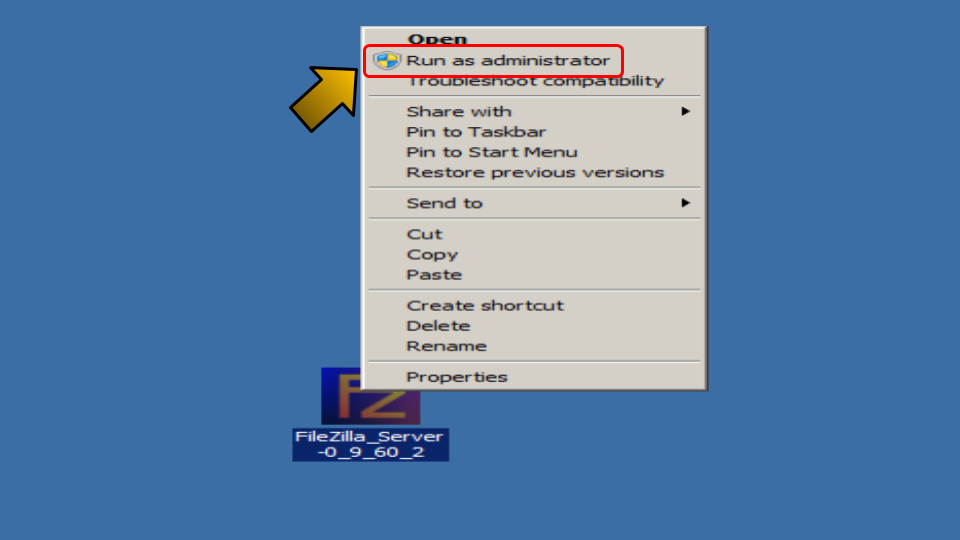
Right-click on the Filezilla_server icon
Then choose "Run as administrator"
Then click on "I Agree"

Let these settings as default as here
Then press next

Now: the destination folder appears here
You can change it from "Browse" here
Or let it as default
Then press next

Let these settings as default as shown here
Then press next

Also, Let these settings as default as here
Then press install

After "installation complete" appears with you
Then press close

If this screen appears that means:
You have a missing update
You can make a full windows update
Or just download the missing update
So, click on "OK"
And keep following with me

Now: we will only download the missing update
Goto google search and type: "Update for
windows server 2008 R2 x64 Edition(KB2533623)"
Then press on the first link:
"Download Update for windows server 2008 R2 x64
Edition- Microsoft"

Then click on "Download"

Your update will be downloaded with you as shown here

After being downloaded
Double-click on this update to install it

Now: click on "Yes"

The update installation will be proceeding
with you as shown here
Let it be completed

Open the FileZilla server interface
By clicking on the start button then type: FileZilla
The icon "FileZilla server interface" will appear with you
Double-click on it

Now: click "Connect"

This is the final step
The filezilla_server interface is ready for use

No.2 in practical: creating an account on the filezilla_server
We'll divide it into 2 stagesStage 1: create a user account
Stage 2: open firewall ports

Now, stage 1:
create a user account
As we did before
open the filezilla_server interface icon

Also, click "Connect"

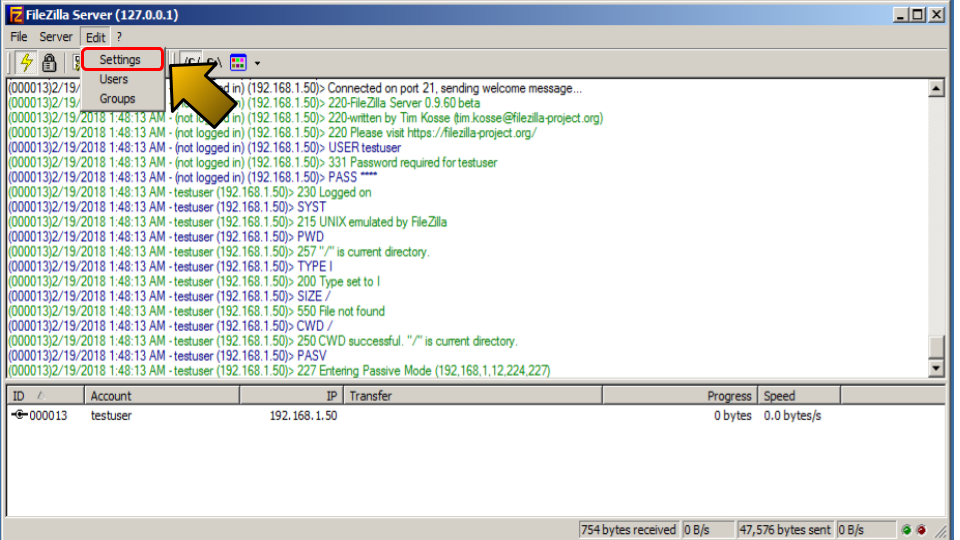
Now: click on "Edit" above
Then choose "Users"

Click on "Add" to add a new user

Now: enter your user
For example here: testuser
Then press "OK"

Now: enable the password
Then enter it as you want

Now: add the folder path on the server to this account
Click on "Shared folders"
After that: click on "Add"

Choose here the folder you want
For example here: we chose the "wwwroot" folder
That's for the website "test.com"
That we've created before on the web server
Then press "OK"

Select all permissions to this user
Then press "OK"

After that: these lines will appear with you
That means that:
The account is created successfully

Stage 2:
Open the firewall ports
Now: click on "Edit" above
Then choose "settings"
Make sure that: the FTP default port is "21"

usually, the FTP server needs a dynamic ports
So, click on the "passive mode settings"
After that: enable this "use custom port range"
Enter here the range you want
For example here: 5000 - 5050
After that: click on "OK"

Now: we will open the firewall
Open the "run" window
By clicking on "start button + R"
Then type: "wf.msc"
After that: click on "OK"

Now: click on the "Inbound rules"
Then click on "New Rule"

After that: choose "port" as shown here
Then click "next"

Select the "Specific local ports"
Then: enter the FTP ports as shown here "21, 5000-5050"
Then click "next"

Make sure that's on "Allow the connection"
Then press "next"

Let these settings as default as here
Then press next

Choose the name of the role:
For example here: "FTP ports"
Then press "Finish"

Now: No.3 in practical- Transporting data and testing this accountOn your computer

First: open the cmd on your computer
Then type this command "ping the IP of the FTP
Filezilla server machine'"
That's here in our example: 192.168.1.12
Make sure it's replying on you as shown here
If not, you must check the network configuration
Between your computer and the FTP server virtual machine
That you've created with me

Now: open the "internet explorer" on your computer
Then type this URL:
ftp://"the IP of the FTP Filezilla server machine"
That's here: 192.168.1.12
Then press Enter

Here: type the username and password
That we've created in the FTP Filezilla server before
Then press on "Log On"

Now: the "wwwroot" files will be showing with you
as shown here
The "wwwroot" is the folder that we've pointed to
In the FTP account that we've created

For more clarification: press "page" above
Then select "Open FTP Site in Windows Explorer"

Then, retype the username and password here
Then press "Log On"

The "wwwroot" folder in the server will be shown with you
As shown here as it would be on your device
So you can change it or Add or delete as you want

For example here: add anew text file with the name
"hello.txt"

Now: go to the virtual server machine of the FTP
You will see this line

If you open the folder path on the server
That was "C partition then domains then test.com
folder then the wwwroot folder"
You'll find the "hello.txt" that you've created

This is the end of lesson 5
I wish it was usefulFor any questions or inquiries
kindly contact me
Through the social links under this video
Or type your comment
I will reply to you as soon as possible
In the next lesson InshaAllah
We will talk about the VPN server
Peace be upon you


No comments:
Post a Comment